In this post I’ll show you how to install ADB and fastboot drivers on Windows. This procedure will work on any Windows version Windows 7, 8, 8.1 and 10. Following this you don’t need to download whole Android SDK Tools, you’ll just install most used android system utilities ADB and fastboot drivers.
Android Debug Bridge (ADB) is command-line tool that let you communicate and perform action on android device through computer. ADB provide access to Unix Shell through which you can tr various commands on an android device and can perform actions such us installing application. Whereas Fastboot is also a utility program with commands that let you able to flash recoveries and ROMs. Wither custom or stock recovery, images and third-party ROMs.
There are 2 methods to install ADB and fastboot one is normal in which you have to be in directory of ADB and fastboot to run a command other is installing ADB and fastboot system-wide, which means you can access ADB and fastboot from any directory. I’ll try to cover both topics as clear as possible.
[section label=”Method 1″ anchor=”Method 1″][badge][Method 1][/badge]
Installing ADB and fastboot on Windows
[label variation=”label-primary”]Step 1:[/label] Download platform-tools-latest-windows.zip. It contains ADB and fastboot tool files.
[label variation=”label-primary”]Step 2:[/label] Extract zip file and open extracted folder.
[label variation=”label-primary”]Step 3:[/label] Now that’s the difference b/w this method and system-wide method. In order to use these tools you have to open command prompt (cmd) and your working directory should be the folder you extracted
[alert variation=”alert-info”][label variation=”label-info”]Note:[/label] You can also open command prompt (cmd) in the folder by opening folder which you extracted and pressing “Shift+Mouse Right Click” and clicking “Open command window here”.[/alert]
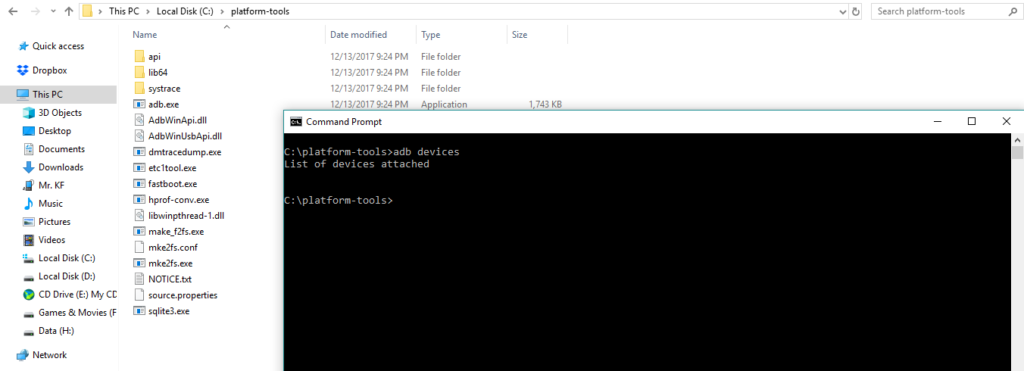
[label variation=”label-primary”]Step 4:[/label] To make sure ADB and fastboot commands are executing, run the following command after connecting your android device
adb devices
If the command executes successfully it’ll show your device in list under “List of device Attached”.
[alert variation=”alert-info”][label variation=”label-info”]Note:[/label] To use ADB command you must enable “USB Debugging” option on your device. To do so go to “Settings > Developer Options” and check “USB Debugging” option. If developer option is not showing go to “Settings > About” and Tap 7 times on “Build Number” this will enable “Developer Option”.[/alert]
[section label=”Method 2: System Wide” anchor=”Method 2: System Wide”][badge][Method 2][/badge]
Installing ADB and fastboot on Windows System-Wide
[label variation=”label-primary”]Step 1:[/label] Download platform-tools-latest-windows.zip. It contains ADB and fastboot tool files.
[label variation=”label-primary”]Step 2:[/label] Extract zip file somewhere. For example, C:\adb-fastboot
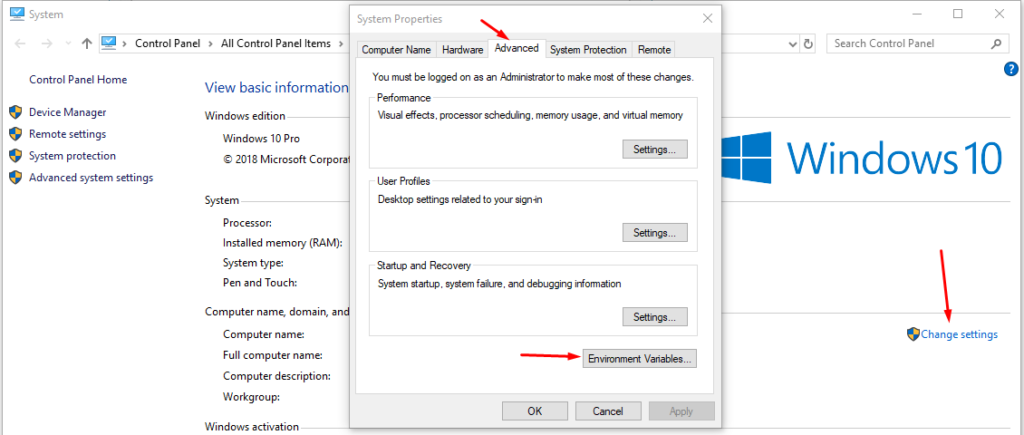
[label variation=”label-primary”]Step 3:[/label] Write click on “My Computer” on desktop and click on “Properties”.
[label variation=”label-primary”]Step 4:[/label] Click on “Advance” tab.
[label variation=”label-primary”]Step 5:[/label] Click on “Environmental Variables” button.
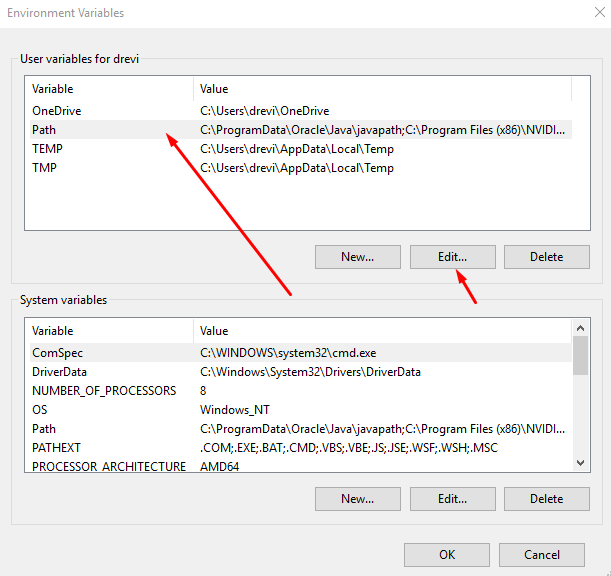
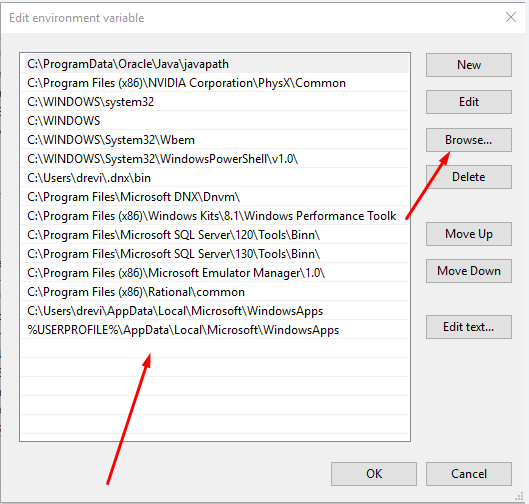
[label variation=”label-primary”]Step 6:[/label] Hightlight “Path” variable and click on “Edit” button.
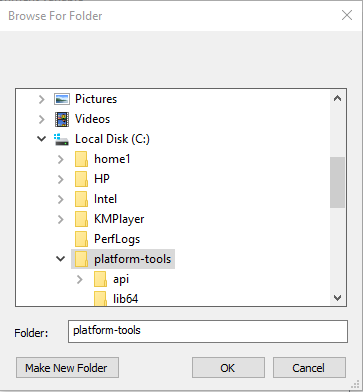
[label variation=”label-primary”]Step 7:[/label] Click on “Browse” button and select the location you extracted the above zip file.
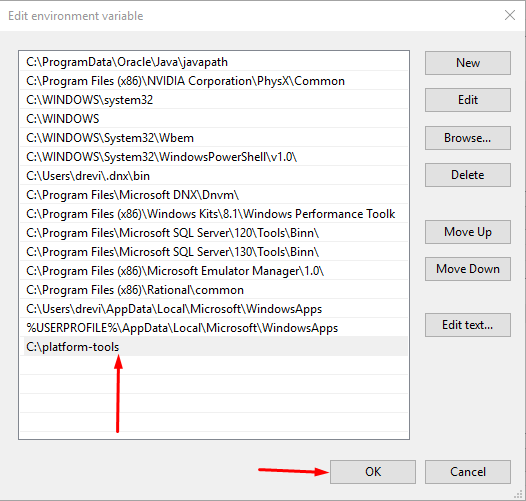
[alert variation=”alert-info”][label variation=”label-info”]Note:[/label] You must not highlight any existing path as it’ll replace the existing path with the new one and your windows or program might run into a trouble. Please carefully select the empty row as shown in screenshot.[/alert]
[label variation=”label-primary”]Step 8:[/label] Click “OK” on all windows open.
[label variation=”label-primary”]Step 9:[/label] Install Universal ADB Drivers, and reboot.
That’s it now you have successfully install ADB and fastboot on your Windows. I’ll write more about ADB and fastboot in my other posts their commands and working and also how to install them on other OS.




Comments 2